Here are some simple ways to take print screen on Mac system. If you are using Mac for the first time, these tips can be very helpful for you.
Screenshots are a great way to share your favorite images, your high scores in a video game, glimpses of your Social Media news feed and conversations, bugs that you want to report, and almost anything and everything that you see on your device’s screen.
The screenshot is a common feature of all the smartphones nowadays, but if you didn’t know this already, you could take a snip of your computer’s screen as well.
What is called as the print screen in Windows is known as a “screenshot” or “screen capture” in iOS?
If you are a Mac user, however, you would have noticed that unlike Windows, Mac does not come with a “print screen” button on the keyboard.
This is done to simplify the keyboard and also because you can customize your actions depending on the type of screenshot that you want to take.
Mac allows you to capture different portions of your screen by using a combination of different keywords shortcuts making it easier for you to snip exactly what you want.
You can capture your entire screen or a small portion of it, depending upon your need. The screenshot is then auto-saved to your desktop.
When a screenshot is taken, a complete image of the desktop along with the open and running applications is captured which is then dumped into a unique file on the Mac desktop.
The keyboard shortcuts are a great way of getting the desired snip instead of using a single “Print Screen” button and later cropping your screenshots.
6 Ways to Print Screen on Mac System
Following are a few different and straightforward ways in which you can take a screenshot on your Mac:
1. Taking a Screenshot of The Entire Screen
Taking the screenshot of the entire screen is similar to the “print screen” feature in Windows. It is specifically useful when you want to capture the navigation of a website or want to share the complete structure of your Mac’s screen with others.
Follow the steps given below to take a screenshot of your Mac screen and save it to your desktop.
- Open all the apps and windows that you want to capture and arrange them in the way you want to see them saved.
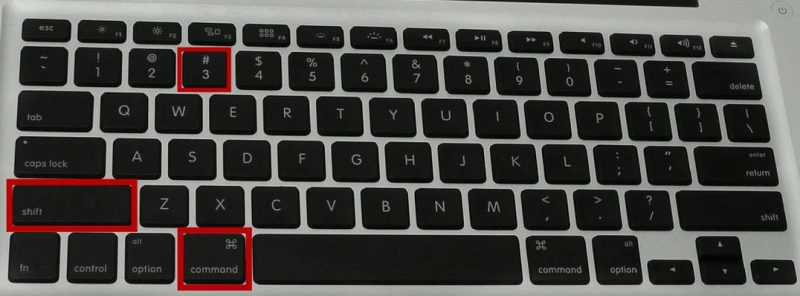
- Press ‘Command’+ ‘shift’+ ‘3’, all at the same time.
- Your Mac will generate the sound of a camera capture, and that’s when you know that your screenshot has been captured. It will appear on your Mac desktop in a.PNG format with the title “screenshot (date and time).”
- You can later open the screenshot and click on ‘Open with’ if you wish to open or share it with a different app.
2. Taking a Screenshot of a Part of The Screen
Sometimes, you just need a part of the screen in a screenshot, and it can be easily done by following a few basic shortcuts.
Doing it otherwise is a cumbersome task; taking the full-screen capture and saving it, cropping the part of the screen you require and saving it again.
With Mac, you don’t have to worry. Just follow the steps cited below and capture only a specific part of the screen:
- Open the apps and windows that you want to capture and place them the way you want to see them saved in the screenshot.
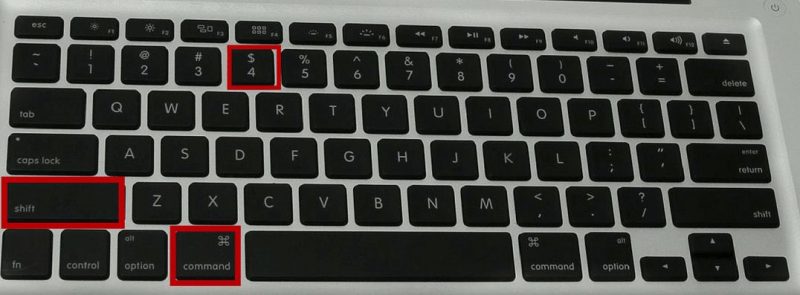
- Press ‘Command’+ ‘shift’+ ‘4’ all at the same time. The pointer will change into crosshair allowing you to choose the area that you want in your screenshot.
- Place the crosshair cursor at the particular corner of the area you wish to capture and then click and hold.
- Drag the cursor to the diagonally opposite corner of the area you want to capture.
- The crosshair cursor lets you customize the size of screenshot by using its pixel count feature. Click on ‘option’ to change the lock point to the center of the area. Once the lock point is set, click on the ‘shift’ button to lock all the sides except the one in the direction you are currently working on.
- When you are done with selecting the area, release the mouse button or trackpad. Your selected area will appear in an outline.
- That’s it! Once you hear the camera capture, your screenshot is captured, and it will appear in.PNG format on your desktop.
- Choose ‘open with’ after a right click if you want to view or share the screenshot with a different application.
3. Taking A Screenshot Of A Specific Mac App Window
This is particularly useful when you want to capture information or error on a specific screen inside a Mac app.
- Go to the app or window you want to take a screenshot of and open it.
- Click on ‘command’+ ‘shift’ + ‘4’ buttons all at once. Your cursor will then become a crosshair.
- Press the spacebar; it will change your cursor into the camera.
- Place the camera cursor at the top of the window of which you wish to take the screenshot. The window will get highlighted in blue color so that you can ensure that it’s the right one.
- Click on it to take a screenshot.
- You’ll hear the sound of a camera capture and your screenshot will be saved on the desktop in a.PNG format, with the ‘screenshot (date and time)’ written under it.
- Double click on the screenshot to preview it. Right-click and choose ‘open with’ if you want to view or share the screenshot with a different application.

Pro Tip: This method can also be used to capture a specific drop-down menu, although only the menu will be captured.
4. Taking Screenshot of A Menu
Why take the screenshot of the entire screen when all you need is the snip of a menu? Follow the steps given below and do it with ease:
- Click on the menu to open it and reveal its contents.
- Press ‘command’+ ‘shift’+ ‘4’ simultaneously. The pointer will change into a crosshair.
- Drag the crosshair to select the menu you want to capture.
- Release the mouse or trackpad button. If you want to cancel, press the escape (Esc) button before releasing the trackpad or mouse button.
- The screenshot will be taken and saved as a .PNG file on your Mac desktop.

5. Taking A Screenshot Of The Touch Bar
In case you need to capture a Touch Bar, this can be easily done by following a few simple steps:
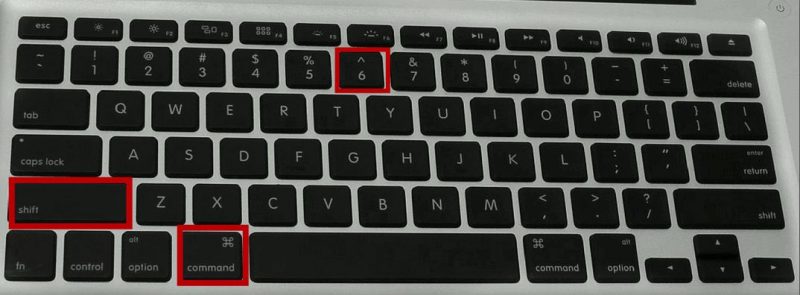
- Press ‘command’+ ‘shift’+ ‘6’, all at once.
- You will hear the sound of a camera capture and that’s when you know the screen has been captured.
- You’ll find the screenshot on your Mac desktop in a .PNG format.
This works for the users who have a Mac with a Touch Bar and macOS Sierra 10.12.2 or later.
Pro Tip: The control strip region of the touch bar can be customized to include a screenshot button. You can then tap on the screenshot button to see options for the types of screenshots and locations where it can be saved.
6. Saving a Screenshot Directly To Your Clipboard
In some cases, you may want your screenshot to be saved at a location on your computer other than the desktop.
Other than your Mac Desktop, you can even save the screenshots or screen captures directly on your clipboard. Here’s how you can do this:
- Follow all the above-mentioned steps and save your screenshot in the same way as you would do to save it on the Mac desktop.
- Press ‘command’+ ‘shift’+ ‘3’ simultaneously to save the whole screen screenshot to your desktop.
- Press ‘command’+ ‘shift’+ ‘4’ to screenshot a particular window of the screen. Press ‘space bar’ after taking the screenshot to save it to your clipboard.
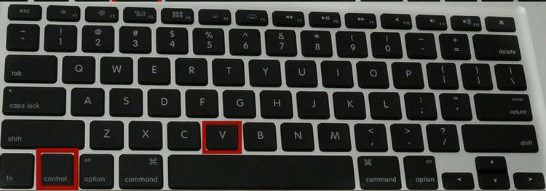
- Open the document or image editor of your choice and press ‘Control+V’ or choose ‘Paste’ from the menu to copy paste the screenshot out of the clipboard and into the window.
7. Screenshot With Shadow Effect
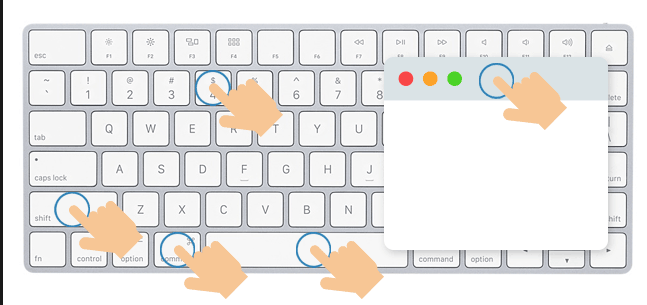
If you wish to take a screenshot with a shadow effect on your Mac system, you can easily do that by pressing shift+command+4+Space
The above-stated methods for taking screenshots with your Mac work perfectly with OS Sierra, OS X El Capitan, OS X Yosemite and most of the older versions of the modern Mac operating system.
Some windows or applications may not allow screen captures, especially when they are designed to play copy-protected videos.
But other than that, you can use these ways to capture any portion of the screen on your Mac in a hassle-free manner.

